
Interfacing of ACS712 with Arduino
In this project, I have interfaced ACS712 current sensor with Arduino UNO and displayed its value over to LCD.
Hello friends, I hope you all are doing great. In today's project, I will interface current sensor with Arduino and display its values over to LCD. It's a simple one but used in a lot of engineering projects. IT comes in handy if you want to increase your battery life as using this sensor you can be aware of your major power consumers and thus can remove them. So, let's have a look at How to interface Arduino with ACS712:
Interfacing of Arduino with ACS712
These are the components which I have used in designing this project:
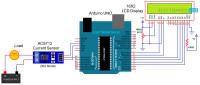
Interfacing of Arduino with ACS712
These are the components which I have used in designing this project:
- Arduino UNO
- LCD 20 x 4
- Jumper Wires
- ACS712 Current Sensor
- Lamp 12V
I have used 12V lamp as a load and have measured its current using this ACS712 current sensor and Arduino. I have displayed the values over to LCD 20 x 4. Here's the code which I have used for this project:
#include  //library for LCD

// initialize the library with the numbers of the interface pins
LiquidCrystal lcd(8, 9, 10, 11, 12, 13);

//Measuring Current Using ACS712

const int analogIn = 0; //Connect current sensor with A0 of Arduino
int mVperAmp = 185; // use 100 for 20A Module and 66 for 30A Module
int RawValue= 0;
int ACSoffset = 2500;
double Voltage = 0; //voltage measuring
double Amps = 0;// Current measuring

void setup() {
  //baud rate
  Serial.begin(9600);//baud rate at which arduino communicates with Laptop/PC
  // set up the LCD's number of columns and rows:
  lcd.begin(20, 4);  //LCD order
  // Print a message to the LCD.
  lcd.setCursor(1,1);//Setting cursor on LCD
  lcd.print("www.TheEngineering");//Prints on the LCD
  lcd.setCursor(4,2);
  lcd.print("Projects.com");
  delay(3000);//time delay for 3 sec
  lcd.clear();//clearing the LCD display
  lcd.display();//Turning on the display again
  lcd.setCursor(1,0);//setting LCD cursor
  lcd.print("Reading Values from");//prints on LCD
  lcd.setCursor(1,1);
  lcd.print("DC Current Sensor");
  lcd.setCursor(5,2);
  lcd.print("ACS 712");
  delay(2000);//delay for 2 sec
}

void loop() //method to run the source code repeatedly
{

 RawValue = analogRead(analogIn);//reading the value from the analog pin
 Voltage = (RawValue / 1024.0) * 5000; // Gets you mV
 Amps = ((Voltage - ACSoffset) / mVperAmp);

//Prints on the serial port


 Serial.print("\t Amps = "); // shows the voltage measured
 Serial.println(Amps,3);// the '3' after voltage allows you to display 3 digits after decimal point

 lcd.setCursor(1,2);
 lcd.print("Current = ");
 lcd.setCursor(11,2);
 lcd.print(Amps,3);
 lcd.setCursor(16,2);
 lcd.print("A"); //unit for the current to be measured
 delay(2500); delay of 2.5 sec
}
I hope you have enjoyed today's project and will get help from it in your engineering projects.
Diskussion (0 Kommentare)