Peltier Cloud Chamber

DIY cloud chamber using a beefy CPU cooler and a single Peltier module too see ionizing radiation with your own eyes!
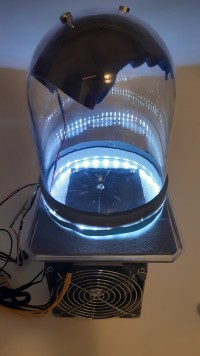
This cloud chamber is based on a standard dual-tower CPU cooler and a TEC2-25408 Peltier cooler. The Peltier cools down the 10 x 10 cm copper plate on top to less than -30°C so that the Isopropyl alcohol evaporating above condenses at the base, creating a thin fog layer. Ionizing radiation can then fly through this alcohol vapor and with some luck create a visible cloudy trace.
Trace thickness and length depends on the type of radiation: thin and long traces come from beta radiation and thicker as well as shorter traces are a sign of alpha particles.
For this I took a single TEC2-25408 Peltier element, which sits on a Thermalright Peerless Assassin 120 CPU air cooler. On the cold side of the Peltier sits a 100 x 100 x 2mm copper plate into which I drilled 4 holes. The plate is then attached to the cooler mount with plastic screws (to limit thermal losses) through the holes. This makes it all mechanically pretty stable. I then screwed an acrylic plate under the copper plate, on which I put the bell jar and the LEDs. In addition, of course, I insulated everything around the Peltier element, acrylic and copper plates with self-adhesive, cut PE tape.
The LEDs are actually controllable RGB LEDs, which I formed into a ring, wrapped around the glass and set to solid white. I'm not doing any more with them at the moment. I could change colors, brightness, etc., but that's not really necessary.
Everything is connected to a normal ATX PC power supply: The Peltier element is connected to an 8-pin CPU connector and everything else to the 24-pin motherboard connector. I still had the power supply and it is semi modular, i.e. I only have the 2 cables attached to it and therefore not too much cable clutter. I just left all the other optional cables out.
After waiting a few minutes, the copper plate cools down to around -33°C. I actually expected a bit more, mainly because the whole setup only draws around 85 watts (relatively little, maybe more cooling potential?). But hey, I'm still really happy with it for now.
Actually a very classic structure as you often find it. But what I haven't seen that often is that the fan mount is used to hold everything together and that only a single Peltier is used. Most of the time you have two or three "small" ones on top of each other and what I've seen too often is that everything is somehow held together with hot glue.
This project is also on Hackaday.io: https://hackaday.io/project/192146-peltier-cloud-chamber
If you enjoy what I do, consider supporting me on Ko-fi! Every little bit means the world! https://ko-fi.com/nuclearphoenix


Updates des Autors