Mini-Wheelie Self-Balancing Robot
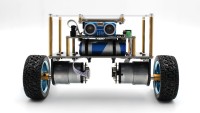
Self-Balancing Robot (Elektor project 240134)
This is Not a Toy!
The Elektor Mini-Wheelie self-balancing robot is intended as an educative project for engineering students, it is certainly not as a toy. The self-balancing robot is a popular topic in engineering courses, and this robot provides a suitable platform for it. Furthermore, the Mini-Wheelie has many extras to play with like an ultrasonic transducer, full-colour graphic TFT display and a power monitor, beside the wireless capabilities of the ESP32-S3.With the software loaded from this page (not the out-of-the-box demo), the robot has basic self-balancing functionality and can be controlled from a smartphone with the Dabble app. It is not an all-singing all-dancing gadget, it is a platform for the user to build and improve on.
The hardware for the Mini-Wheelie was developed by Makerfabs in cooperation with Elektor. The software that can be downloaded from this page was developed by and tested at Elektor. Everything is based on open-source projects found online and adapted for the Mini-Wheelie.
Software Installation
There appears to be an issue with the ESP32-S3 and Arduino on Apple computers. The solution is to enable USB CDC on Boot (not tested): Tools > USB CDC On Boot > EnabledArduino IDE The Arduino IDE configured for the ESP32-S3 microcontroller is required to compile and upload the software for the Self-Balancing robot. Refer to https://www.elektormagazine.com/labs/esp32-getting-started for detailed instructions on how to install the Arduino IDE for the ESP32. In this manual Arduino IDE V1.8.19 is used but the most recent V2 (V2.3.4 at the time of writing) can be used too.
Use ESP32 Arduino Core 2.0.17
The default Self-Balancing Robot software uses the Dabble library for Bluetooth control (https://thestempedia.com/product/dabble/). Dabble does not work (yet) with ESP32 Arduino Core V3.0.0 or higher. Therefore, when installing the ESP32 in the Arduino IDE, make sure to select version V2.0.17 (step 3 in the illustration below).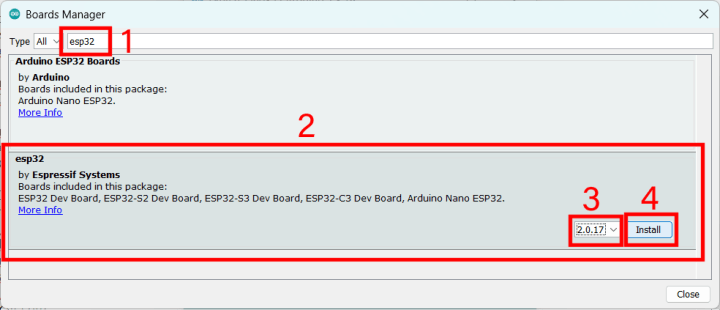
Select the ESP32-S3 controller board: Tools -> Board -> ESP32 Arduino -> ESP32S3 Dev Module
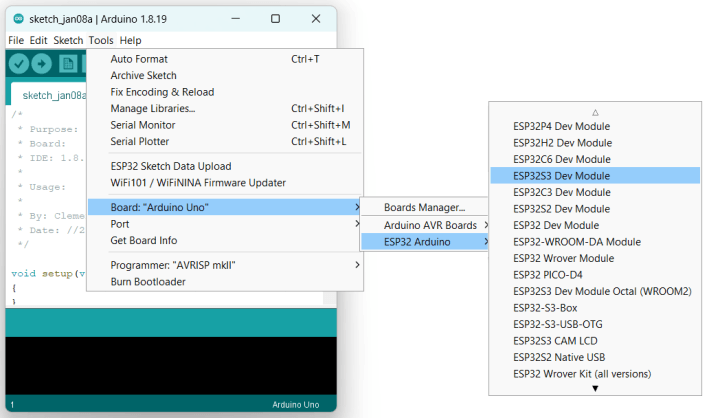
Select the port for the ESP32-S3 controller board: Tools -> Port

Download the Software
https://www.elektormagazine.com/labs/self-balancing-robot-with-maker-fabsDownload the archive and unpack it to the Arduino IDE’s sketchbook folder. If you don’t know where it is, check the Arduino IDE’s preferences (File -> Preferences).
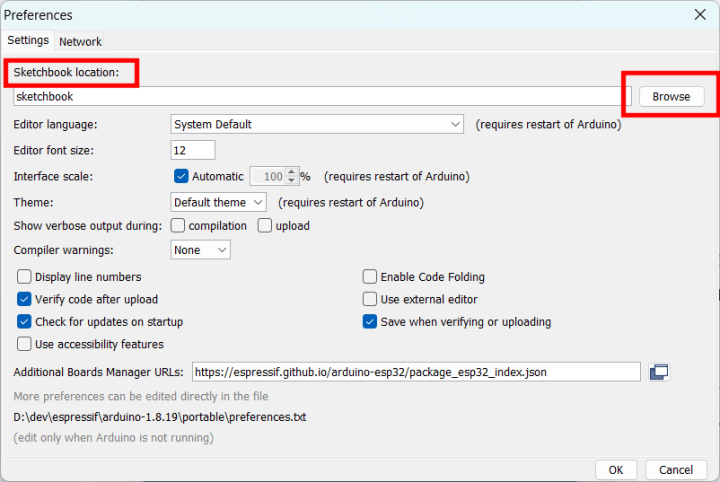
If the Arduino IDE is running, close it and restart it.
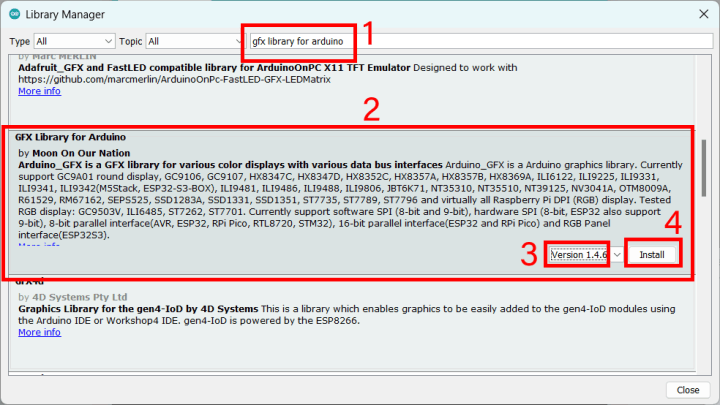
The download contains all the libraries except for the big graphics library, which you must install yourself. Install version 1.4.6 of the library “GFX Library for Arduino” by “Moon On Our Nation” using the Library Manager (Sketch -> Include Library -> Manage Libraries… or press Ctrl+Shft+I).

microSD Card
The download also contains a folder named sdcard. Using a computer, copy the files contained in this folder to a suitable microSD card and stick it in the microSD card slot of the robot.Calibration
For best results it is necessary to calibrate the software for the Self-Balancing Robot. To do so, place the robot in a fixture that lifts the robot so that its wheels can rotate freely. Also make sure that the robot is horizontal in all directions (the XY-plane).IMU Calibration
Upload the sketch SBRobot_IMU_Zero. Open the Serial Monitor and set the baud rate to 115200. Reset the robot and wait for the sketch to finish (takes a few minutes). The output of the sketch will look something like this (your values will be different):XAccel YAccel ZAccel XGyro YGyro ZGyro
[-2387,-2385] --> [-9,4] [975,976] --> [-6,14] [1242,1243] --> [16379,16393] [102,103] --> [0,3] [-60,-59] --> [-2,1] [72,73] --> [-1,1]
[-2387,-2386] --> [-9,1] [975,976] --> [-9,14] [1242,1242] --> [16379,16385] [102,103] --> [0,3] [-60,-59] --> [-2,1] [72,73] --> [-3,1]
[-2387,-2386] --> [-16,1] [975,976] --> [-8,14] [1242,1242] --> [16383,16385] [102,103] --> [0,3] [-60,-59] --> [-2,1] [72,73] --> [-2,1]
-------------- done --------------
Enter the offset values in the sketch SBRobotDabble (somewhere starting around line 100). Your values will be different, do not keep the default values:
#define X_OFFSET_ACCEL (-2387)
#define Y_OFFSET_ACCEL (975)
#define Z_OFFSET_ACCEL (1242)
#define X_OFFSET_GYRO (102)
#define Y_OFFSET_GYRO (-60)
#define Z_OFFSET_GYRO (72)
#define Y_OFFSET_ACCEL (975)
#define Z_OFFSET_ACCEL (1242)
#define X_OFFSET_GYRO (102)
#define Y_OFFSET_GYRO (-60)
#define Z_OFFSET_GYRO (72)
Motor Calibration
Upload the sketch SBRobot_Motor_Compare. Follow the instructions at the top of this sketch to find the minimum motor speed and motor speed corrections left and right. Enter these values in the sketch SBRobotDabble (around line 109 for MOTOR_MIN_ABS_SPEED and line 125 for motor_speed_multiplier_left and motor_speed_multiplier_right). Your values will be different, do not keep the default values:#define MOTOR_MIN_ABS_SPEED (55)
…
double motor_speed_multiplier_left = 1.0; // R_max/L_max
double motor_speed_multiplier_right = 0.97; // L_max/R_max
…
double motor_speed_multiplier_left = 1.0; // R_max/L_max
double motor_speed_multiplier_right = 0.97; // L_max/R_max
With the adjustments made, upload the sketch SBRobotDabble to the robot. Make sure to compile it with the ESP32 Arduino core 2.0.17 (or lower, see above). Disconnect it, switch it off, switch it on again and carefully place it on the floor. Make sure there is enough free space.
Install Dabble on a smartphone or tablet, see https://thestempedia.com/product/dabble/
Use Dabble in Gamepad mode. Do not connect the smartphone to the 'SBRobot' Bluetooth device, let Dabble do it for you.
Place the robot upright, keep it up with a hand or a foot so you can release it easily.
Switch on the robot. Wait for the connect message to appear on its display.
Connect the Dabble app to the robot. When the app is connected (a smiley is shown), the robot starts to balance.
Up/Down/Left/Right only work separately, they should not be pressed together. Be careful, remote control is quite complicated, and it is easy to lose control. The robot may fall over and even jump around.
It may be surprising, but the robot balances best on a rough surface. An uneven surface prevents the robot for gaining too much speed and get out of control.
The default PID settings will probably work reasonably well but adjusting them may improve the robot’s balancing performance. The PID parameters are found at line 165:
double Kp = 22;
double Kd = 2;
double Ki = 40;
double Kd = 2;
double Ki = 40;
Kp (P = Proportional) has the most influence. High values will make the robot too nervous, low values will make it too slow. Ki (I = Integral) and Kd (D = Derivative) are used for fine tuning. Use small increments/decrements when playing around and be patient. Decimal values are accepted.
Power Monitor
A power monitor is available for monitoring battery voltage and motor power. This can for instance be used to adapt the PID response to the battery level. See lines 24 to 27:#include
#define INA219_I2C_ADDRESS (0x40)
DFRobot_INA219_IIC power_monitor(&Wire,INA219_I2C_ADDRESS);
boolean power_monitor_ok = false;
#define INA219_I2C_ADDRESS (0x40)
DFRobot_INA219_IIC power_monitor(&Wire,INA219_I2C_ADDRESS);
boolean power_monitor_ok = false;


Diskussion (39 Kommentare)